Saturday, January 7, 2017

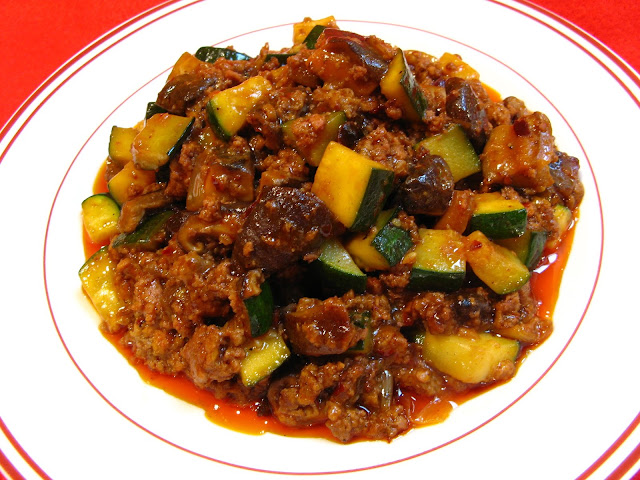
Black Bean Chili Oil Ground Turkey with Zucchini (黑豆辣椒油意大利青瓜火雞, Hak1 Dau6 Laat6 Ziu1 Jau4 Ji3 Daai6 Lei6 Ceng1 Gwaa1 Fo2 Gai1)

Copyright © 2017 Douglas R. Wong, all rights reserved.
This dish is usually made with ground pork, but ground turkey makes a good substitute when it’s handy. The dish is really simple to make and if you’re pressed for time, marinating the ground turkey can be omitted. This is a very inexpensive dish to make, since it’s basically ground meat with vegetables in a (spicy) sauce, and it’s one of the dishes I grew up eating. You can use any ground meat and any vegetable that’s in season to make variations of this recipe. I added Shiitake mushrooms, but the mushrooms can also be omitted if desired.

Enjoy!

Wednesday, January 4, 2017

Dungeness Crab Scrambled Eggs (北美大肉蟹炒蛋, Bak1 Mei5 Daai6 Juk6 Haai5 Caau2 Daan6)

Copyright © 2017 Douglas R. Wong, all rights reserved.
Scrambled eggs and seafood is a tasty combination, with the most common Chinese restaurant dish using shrimp. My versions of these dishes can be found here: Shrimp and Scrambled Eggs (蝦仁炒蛋, Haa1 Jan4 Caau2 Daan6) and Shrimp and Dungeness Crab Scrambled Eggs (蝦仁北美大肉蟹炒蛋, Haa1 Jan4 Bak1 Mei5 Daai6 Juk6 Haai5 Caau2 Daan6). Since Dungeness crab, a local delicacy, is in season now, here’s a recipe just using cooked Dungeness crab meat. If you’re not fortunate enough to be able to obtain Dungeness crab meat, any frozen or canned crab can be substituted.

Personal preference determines the amount of eggs to use in this dish. The ratio of eggs to seafood depends (obviously) on the number of eggs used to the amount of seafood. If more eggs than seafood is desired, use more eggs, or use fewer eggs if more seafood than eggs is desired. You can, of course, reduce the amount of seafood used to increase the egg ratio. The dish pictured in the recipe used six eggs.

Enjoy!

Tuesday, January 3, 2017

Steamed Egg Custard Scallops (蒸水蛋扇貝, Zing1 Seoi2 Daan6 Sin3 Bui3)

Copyright © 2017 Douglas R. Wong, all rights reserved.
Happy New Year to everyone! For my first recipe of the year, here’s a quick cooking (and it’s really easy to make) steamed egg custard dish using scallops. The classic Chinese-American dish uses ground pork instead of scallops. I can’t take credit for substituting scallops for pork, since I got the idea from a restaurant menu. I also found out that one pound of frozen scallops yields one-half pound thawed, so be sure to use enough thawed scallops in this dish. I’ve also had a version of this dish using clams in their shells, so there must be more variations that I haven’t run into yet.

The taste of this dish is greatly influenced by the quality of the stock used to scramble the eggs. The dish will taste different if canned or homemade stock is used, so I try to use homemade stock from the Bone Soup (, Tong1) recipe whenever possible. Since scallops are such a luxurious ingredient, using homemade stock is a must in my mind. The scrambled egg mixture needs to cover the scallops. The amount you’ll need depends upon the size of the scallops used and the size of the steaming plate. The classic recipe uses 2 eggs and ½ cup (250 ml.) of stock, but in this case I needed more egg mixture to cover the scallops, so I increased the recipe to 3 eggs and ¾ cup (375 ml.) of stock. All the air bubbles need to be removed from the egg mixture after pouring onto the scallops or the surface won’t be smooth once it’s steamed. I’ve seen some recipes where the egg mixture is strained or the bowl is covered with aluminum foil before steaming to prevent any water from settling on the egg custard surface (which mars the cooked surface). I don’t bother to strain or cover the egg custard while steaming, but they are options you can consider.

Enjoy!

Thursday, December 29, 2016

Dungeness Crab Clay Pot Rice (煲仔北美大肉蟹飯, Bou1 Zai2 Bak1 Mei5 Daai6 Juk6 Haai5 Faan6)

Copyright © 2016 Douglas R. Wong, all rights reserved.
This will likely be my last post for 2016. Since Dungeness crab, a crab local to where I live, is in season now and making this tasty recipe is real easy, I felt that this would be an appropriate last dish for the end of the year. I hope you’ve enjoyed, and maybe tried, a few of the recipes that I’ve posted this year. I wish you and your family a Happy New Year for 2017!

As I stated earlier, Dungeness crab is a local delicacy and it’s in season right now. I’m fortunate enough to be able to buy cooked Dungeness crabs at my local Asian market. I find that to be a real time saver since I don’t have to cook the crabs before shelling to separate the meat from the shell. Dungeness crabs are usually weigh around one pound (454 grams) and yield about half their weight in meat (1/2 lb. or 277 g.). So you’ll need at least two crabs to get approximately 1 lb. (454 g.) of meat. If you’re pressed for time or can’t obtain Dungeness crab, you can always use canned or frozen crab. The crab is added at the end of cooking (when the clay pot rice rests for 10 minutes) to heat up the crab and preserve the crab flavor.

I followed the same procedure outlined in the Clay Pot Rice (煲仔飯, Bou1 Zai2 Faan6) recipe, but add mini-Shiitake mushrooms, together with the Dungeness crab meat. The rice is made even tastier by using chicken stock and the Shiitake mushroom rehydration liquid to cook the rice instead of water. I made my own stock using the Bone Soup (, Tong1) recipe, but if you’re pressed for time, canned or boxed stock can be substituted. The other option is to just use the Shiitake rehydration liquid.

Using a clay pot to make rice is very similar to making rice in a pot. A crust is produced on the bottom of the clay pot, similar to cooking rice in a pot, and you don’t have to reboil to release the scorched rice from the bottom. The taste of the rice is very similar to making rice in a pot. The sequence of cooking the rice in a clay pot is:
  1. Pre-heat the clay pot over medium heat for 5 minutes to prevent shocking the clay pot and possible breaking it.
  2. Bring the clay pot rice to a boil over medium-high heat for 10 minutes.
  3. Simmer the rice for 15 minutes over low heat.
  4. Scorch the rice using medium-high heat for 10 minutes.
  5. Turn off the heat and allow the clay pot to sit for 10 minutes to release the scorched rice from the bottom.
  6. Serve the rice.

Given that there are many variables when cooking rice in a clay pot, the cooked rice will vary from every time you cook it. If more water is used, the rice will take longer to cook. If too little water is used, the rice becomes more al dente and the volume decreases because the rice doesn’t get fluffy. Burner heat will determine how quickly the rice cooks and how scorched the rice will get. You just have to experiment and watch for the indications that signal when the rice is cooked to your personal preference. Making rice in a clay pot seems like a simple task, but you’ll find that it takes practice to get consistent results.

Enjoy!
Sunday, December 18, 2016

Clay Pot Chinese Sticky Rice (煲仔糯米飯, Bou1 Zai2 No6 Mai5 Faan6)

Copyright © 2016 Douglas R. Wong, all rights reserved.

I’ve been cooking all my rice in a clay pot rather than a rice cooker since I prefer the results. For my family’s 2016 Thanksgiving dinner, I made Chinese Sticky Rice (糯米飯, No6 Mai5 Faan6) in a clay pot. I followed the same procedure outlined in the Clay Pot Rice (煲仔飯, Bou1 Zai2 Faan6) recipe, but used the ingredients for Chinese Sticky Rice. I also used dried shrimp and scallops that I buy in bulk from my local Chinese herb and dried seafood store rather than the prepared packages at my local Asian market. If you’re fortunate enough to have a Chinese herb and dried seafood store nearby, you’ll find a wide selection of dried shrimp and scallops (and other seafood) that’s not available at Asian markets.

Using a clay pot to make rice is very similar to making rice in a pot. A crust is produced on the bottom of the clay pot, similar to cooking rice in a pot, and you don’t have to reboil to release the scorched rice from the bottom. The taste of the rice is very similar to making rice in a pot. The sequence of cooking the rice in a clay pot is:
  1. Pre-heat the clay pot over medium heat for 5 minutes to prevent shocking the clay pot and possible breaking it.
  2. Bring the clay pot rice to a boil over medium-high heat for 10 minutes.
  3. Simmer the rice for 15 minutes over low heat.
  4. Scorch the rice using medium-high heat for 10 minutes.
  5. Turn off the heat and allow the clay pot to sit for 10 minutes to release the scorched rice from the bottom.
  6. Serve the rice.
Given that there are many variables when cooking rice in a clay pot, the cooked rice will vary from every time you cook it. If more water is used, the rice will take longer to cook. If too little water is used, the rice becomes more al dente and the volume decreases because the rice doesn’t get fluffy. Burner heat will determine how quickly the rice cooks and how scorched the rice will get. You just have to experiment and watch for the indications that signal when the rice is cooked to your personal preference. Making rice in a clay pot seems like a simple task, but you’ll find that it takes practice to get consistent results.

Enjoy!

Saturday, December 17, 2016

Miso, Sesame, and Sweet Potato Dip with Tortilla Chips

Copyright © 2016 Douglas R. Wong, all rights reserved.
I made this tasty dip, served with fresh tortilla chips from my local Mexican market, for my family’s 2016 Thanksgiving dinner. The original recipe can be found here: Miso, Sesame, and Sweet Potato Dip Recipe. The original recipe was modified to use a microwave oven to cook the sweet potatoes rather than steaming and garlic was added. Orange sweet potatoes really give this dish its color. The trick to making this dip is to add enough water to the food processor to make a smooth mixture because it’s quite stiff, but still edible, if you don’t. I also forgot to add the green onions to the dip after mixing in the food processor, but it’s included in the recipe.

Enjoy!

Thursday, December 15, 2016

Preserved Duck Egg Jellyfish Salad with Mustard Dressing (芥末粉醬皮蛋海蜇沙律, Gaai3 Mut6 Fan2 Zoeng3 Pei4 Daan6 Hoi2 Zit3 Saa1 Leot6)

Copyright © 2016 Douglas R. Wong, all rights reserved.
Here’s a tasty salad I made for my family’s 2016 Thanksgiving dinner. The recipe is very similar to the salad I made in 2015: Shredded Tofu Jellyfish Salad (白豆腐絲海蜇沙律, Baak6 Dau6 Fu6 Si1 Hoi2 Zit3 Saa1 Leot6). It’s actually quite simple to make, consisting mainly of opening packages and cutting the fresh ingredients. The mustard dressing really brought out the flavors in this salad. Unlike most salads, the dressing is made first and then the salad ingredients are added. The salad and dressing are actually made the day before serving, so this makes an ideal dish that can be made the day before and stored in the refrigerator.

Preserved duck egg is a unique ingredient in this salad. Preserved duck egg can be purchased at your local Asian market. Wikipedia has a good article on preserved duck eggs (also called century eggs) if you’re interested in more details. Use an egg slicer to cu the egg into small pieces.

Instant jellyfish comes in a package ready to use (hence the “instant” name). If I translated the Chinese correctly, it’s “jellyfish noodles”. The traditional method to prepare jellyfish is to soak dried salted jellyfish to rehydrate it before cutting into strips (at least a two day effort with a couple of water changes to remove the salt). So you see why packaged instant jellyfish is preferable.

Shredded tofu is also packaged and looks like noodles. This recipe uses both the regular (white) and marinated (five-space), but you can use all of one type if desired. The tofu needs to be parboiled before using (follow the instructions on the package), but other than that, there’s no other cooking needed before assembling the salad. The rest of the fresh salad ingredients are either cut or come already cut.

Enjoy!
Related Posts Plugin for WordPress, Blogger...
//